Monday, October 20, 2014

Bridges Part 7: Arch Bridges / Ponts en Arc

This is a bridge that you will not find in the Polydron Bridges of the World kit. They don't address arched bridges at all. However, at I was wandering around on the internet, I came across and arch bridge made from another type of construction toy. I noticed that it used primarily iscoceles triangles and squares for the main structure of the bridge and I knew that I could probably do something similar with our Polydrons.


Here is where I probably have to admit that I have an obscene amount of Polydrons. Those iscoceles triangles are not as easy to come by as the equilateral and right angle triangles are. Generally you find only a few in some of the kits, but I thought I'd show it to you anyway.  No, the arch is not as nicely rounded as I might like, but it still illustrates the concept. I tried to do another one using easier to find pieces, which I will show you farther down.

For this bridge you need:

28 iscoceles triangles
4 right angle triangles
20 squares or 9 solid squares and 11 Frameworks squares
2 rectangles

Here's the flat layout. I had to pull it apart a little because otherwise some of the pieces overlap.


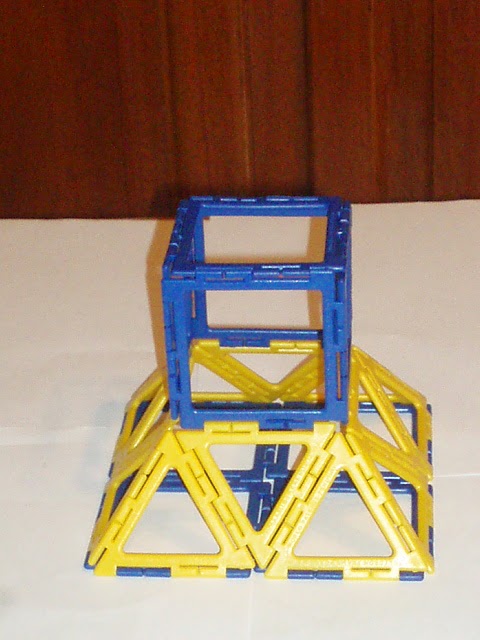
Here's a bridge made from equilateral triangles and squares. It doesn't work out quite as smoothly because there's a jump from the deck of the bridge to the "road" at the ends of the bridge. The middle of the bridge is also a bit pointy, but if that's all you have, you can still make an arched bridge.


For this bridge you need:

24 equilateral triangles
6 right angle triangles
16 squares or 8 solid squares and 8 Frameworks squares
1 rectangle


Here's the flat layout:


I'm not an engineer, but from what I can tell, this type of bridge is used more as a foot bridge because the deck of the bridge actually arches as well. The ones that are used for cars and trains are a bit more complicated in order to keep the deck of the bridge flat. However, it does remind me of ones you can find in Venise.


Sunday, October 19, 2014

Bridges Part 6: Suspension Bridges / Ponts Suspendus

So this is where having the actual Polydron Bridges of the World kit really comes in handy. It makes suspension and cable stay bridges a snap. They can also be made with normal Polydron pieces, but it takes quite a bit more work.

The Polydron suspension bridge from the kit looks like this. It's probably the fastest bridge in the whole kit to assemble:


A suspension bridge made from regular Polydron pieces can be as simple or as complicated as you like. It all depends on how authentic you want it to be and how many pieces you have. My rather complicated version looks like this:


I'm a bit of a perfectionist so I wanted to be sure that it had the suspensions to the left and right of the central part of the bridge, just like in a real bridge. I also wanted to keep the suspension lines as close as possible to being over the deck and not out at some funny angle which isn't realistic. If you're not as picky as I am, then you can make very simple suspension bridges using the same technique with the string.


For this bridge you need:

2 regular plinths (see previous post here)
      20 equilateral triangles
      8 squares
 
2 double plinths (see below)
     36 equilateral triangles
     16 squares
 
2 towers
     54 squares
     8 right angle triangles
     4 iscoceles triangles
 
Bridge
     14 squares either full or Frameworks
     2 to 3 yards of string
 
Here's the flat layout for the double plinth:


I forgot to take a picture of it constructed, but you assemble it just like a normal plinth.
 
Here's a picture of one of the towers sitting on the double plinth and it's flat layout which I needed to pull apart a little because otherwise there would be overlapping pieces in the picture.:


The assembly is very basic and pretty easy to see from the picture. Just don't forget the green square on the underside of the top cross section which helps to consolidate the structure.
 
Now you need to cut two long lengths of string and run them through natural gaps left by the Polydrons in the tops of the towers and down to the regular plinths at the ends. Attach the strings loosely to the plinths so that you can adjust the tension as you go, and be sure that the string sags a little in the middle.


Next, cut small pices of string, making very large knots at one end. Fix the strings between the bridge deck pieces, using the knots to prevent them from slipping through. Tie the other end of the string to the hanging cable, using shorter strings for the very middle and ends of the bridge and longer strings as you get closer to the towers.


Once your strings are all hung, make sure the tension is the way you want it and tie the long cables more securely to the end plinths.
 
I'll admit that all the tying and tension adjustment took me quite a lot of time, but my children were impressed!
 
Pictures of real bridges:


- In New York
 

Links:
Suspension bridges on Wikipedia
 
Suspension bridges on How Stuff Works
  
En Francais:

Pont suspendu sur Wikipedia
 
Pont suspendu sur Tout sur les Ponts
 
Pont suspendu sur Vikidia


Sunday, October 12, 2014

Tesselations / Pavages


Rollin' on the River

I was playing with the right angle triangles the other day when I came up with this:


 Immediately I thought of this:


Which of course in turn led to this:


I used two squares with gimbals and a strut to hang the wheel, which actually turns. You have to be careful to leave a little room between the wheel and the outside square with gimbal to give the wheel enough freedom to turn.


The back looks like this:


Here's the flat layout:


So I hear someone saying, "But I don't have squares with gimbals nor struts....." Well there's always a way to work something out. I did this one using the handle of a wooden spoon. A dowel rod would be much better.


I'll admit that it's less stable and a bit less elegant, but it works. I'm sure that you can come up with other ideas. Maybe some day I'll take the time to make a mill.

Tuesday, October 7, 2014

Polydron Challenge Number 1

In a random exploration playing with our Poydrons, I made this piece using 14 squares. Think you can do the same?


Bridges Part 5: Swing Bridges / Ponts Tournants

So I'm going to set basic truss bridges aside for a little while and move on to bridges that move. Maybe I'll come back to the trusses later, but even so, we haven't left them completely behind since they are one of the fundamental bridge structures.

The Swing Bridge in the Polydron Bridge kit uses a Pratt Truss structure and looks like this:


For mine, I chose a Warren Truss just to show what we can do and mine looks like this:


Now the most difficult thing in this bridge is trying to make a central pivot without specialized pieces, and I'll admit that I did have to use two pieces that not everyone may have.

In the Bridges kit the pivot is made from two square pieces with holes in the middle through which passes a strut and which has an added pulley piece attached in order to keep the strut from slipping through. It looks like this:


That's a lot of specialized pieces. For mine, I used two squares with gimbals which come in some of the Polydron tubs.


 I also gently removed one of the gimbals from one of the squares. You have to be careful in order not to break them:


When you set these two squares on top of each other, they pivot. Here's a view of my pivot system with part of the truss structure pulled aside:


If you have triangle pivot joints, you could probably work out a system as well. I know I have in the past by making a roadbed and all of the truss structure out of only equilateral triangle pieces and by making triangular shaped plinths. However I couldn't find a way to keep the bridge from leaning because none of my Polydron pieces would fit on the ends of the bridge, as I explain here at the bottom of the page.

If you don't have any special pieces, you can always make the bridge and plinths in order to demonstrate the bridge without having any real pivot piece. I'd love to hear if anyone has any ideas about other ways to make the pivot.

The next thing I had to do was modify the plinths. I made two for the end plinths and one with a gimbal square for the central plinth. Here are each of them with their accompanying flat layout:


To make my version of this bridge you need:

3 modified plinths:
     36 equilateral triangles
     26 squares
     1 gimbal square without the gimbal

Warren truss bridge:
     42 equilateral triangles
     22 squares or 10 solid squares and 12 Frameworks squares
     1 square with gimbal

Here's the flat layout of the bridge:


For the Pratt truss version from the Polydron kit, but using my pivot setup and my plinths, you need:

3 modified plinths:
      36 equilateral triangles
      26 squares
      1 gimbal square without the gimbal

Pratt truss bridge:
     36 right angle triangles
     22 squares or 10 solid squares and 12 Frameworks squares
     2 rectangles
     1 square with gimbal

Here's the flat layout of the Polydron kit bridge. You just need to replace the center gray square with the hole in it by a square with a gimbal:


Pictures of real bridges:
- In England


Links:

Swing bridges on Wikipedia with links to pictures of real bridges
 

En Francais:
 
Pont tournant sur Wikipedia
 

Monday, October 6, 2014

Bridges Part 4: The Warren Truss / Ponts a Treillis Warren

For this third bridge, I'm going to show another truss made from equilateral triangles. In the kit the Warren Truss looks like this:


My Frameworks version looks like this:


For this bridge you need:

2 plinths (see previous post here)
      20 equilateral triangles
      8 squares
Bridge
      22 equilateral triangles
      11 squares or 5 frameworks squares and 6 full squares for the road bed
      2 right angle triangles
    
Here's the flat layout of the above bridge:


Here's the flat layout using only Frameworks pieces:


In the Polydron Bridges kit they add squares at each end of the bridge for stability because without them the bridge will lean.


Because my plinth construction is slightly different, you can't use squares, so I've added right angle triangles instead:


Pictures of real bridges:


Links:

Truss bridges on Wikipedia

Warren trusses on Garrett's Bridges
 
 
En Francais:

Ponts a treillis sur Wikipedia

Ponts a treillis sur Gramme